
The common belief that small spaces must feel cramped is a myth rooted in static design; the reality is that a 400 sq ft studio can host generously with the right strategy.
- Fixed, single-purpose furniture creates “dead zones,” while modular pieces unlock transformable, multi-use layouts.
- Success depends on mastering “dynamic clearance”—planning for the movement of furniture, not just static pathways.
Recommendation: Instead of buying a full set, start with a core module (like a versatile ottoman) and build your system over time to match your budget and evolving needs.
The quintessential urban dream often comes with a significant compromise: a prime location in exchange for a minimal footprint. For the young professional in a high-cost city, the 400-square-foot studio is both a sanctuary and a social stage. The challenge is immense: how do you create a space that feels like a personal retreat but can transform in minutes to welcome friends for dinner? The typical advice—add mirrors, paint walls white, buy a sleeper sofa—barely scratches the surface. These are static visual tricks for a dynamic, real-world problem.
This approach often fails because it treats furniture as fixed objects in a too-small box. The result is a space that performs one function poorly rather than multiple functions well. But what if the solution wasn’t about making the room look bigger, but about making its volume work smarter? The true key to unlocking a small studio’s potential is to master the choreography of transformation. This means seeing your furniture not as passive décor, but as active participants in the daily performance of your life, shifting seamlessly between functional states like ‘Lounge Mode,’ ‘Dining Mode,’ and ‘Full Hosting Mode’.
This guide moves beyond generic tips to provide an architect’s framework for selecting, arranging, and scaling modular furniture. We will deconstruct why traditional layouts fail, analyze the mechanics of durable modular systems, and reveal the measurement secrets that prevent costly mistakes. By focusing on a strategy of deliberate, phased acquisition and multi-functional design, you can build a sophisticated, adaptable home that expands its function far beyond its square footage.
To help you navigate this process, this article breaks down the essential strategies for transforming your studio. The following sections provide a clear roadmap, from understanding spatial dynamics to selecting the right materials and planning your kitchen, ensuring every square foot is optimized for both comfort and entertainment.
Contents: Mastering the Art of the Transformable Studio
- Why Fixed Furniture Makes Small Rooms Feel 30% Smaller?
- How to Reinforce Modular Joints to Survive Daily Reconfiguration?
- Velvet or Performance Weave: Which Survives Dining and Sleeping Daily?
- The Measurement Mistake That Makes Modular Sofas Block Walkways
- Which Module to Buy First: Building a Sectional Over 12 Months
- How to Hide a Dishwasher in a Kitchenette Without Losing Storage?
- Why Your Heavy Curtains Aren’t Blocking the Street Noise?
- How to Design a Full Kitchen in Under 6 Feet of Linear Space?
Why Fixed Furniture Makes Small Rooms Feel 30% Smaller?
The perception of a small space isn’t just about square footage; it’s about functional utility. Fixed, bulky furniture—like a traditional three-seater sofa or a permanent dining table—acts as a spatial tyrant in a 400 sq ft studio. It dictates a single, unchangeable layout, creating vast “dead zones.” These are areas that serve a single purpose and remain unused for most of the day, effectively shrinking your usable living area. A formal dining spot might sit empty 90% of the time, while the immovable sofa prevents you from creating a larger open area for a yoga session or hosting a standing cocktail party. This is a primary driver behind the shift to adaptable living, so much so that the modular furniture market reached $81.3 billion in 2023 and continues to grow.
The problem is rooted in static thinking. Fixed pieces obstruct pathways and block natural light, casting shadows that visually constrict the room. Their permanent footprint consumes a non-negotiable percentage of the floor, leaving you with awkward, inefficient slivers of space. In contrast, modular furniture operates on the principle of functional fluidity. Pieces can be separated, reconfigured, or even stacked, allowing the room to transition between different “modes.” An ottoman group can become a coffee table, individual seats, or part of a guest bed. This adaptability eliminates dead zones, ensuring every square inch of your home serves multiple purposes and is always ready for what’s next.
How to Reinforce Modular Joints to Survive Daily Reconfiguration?
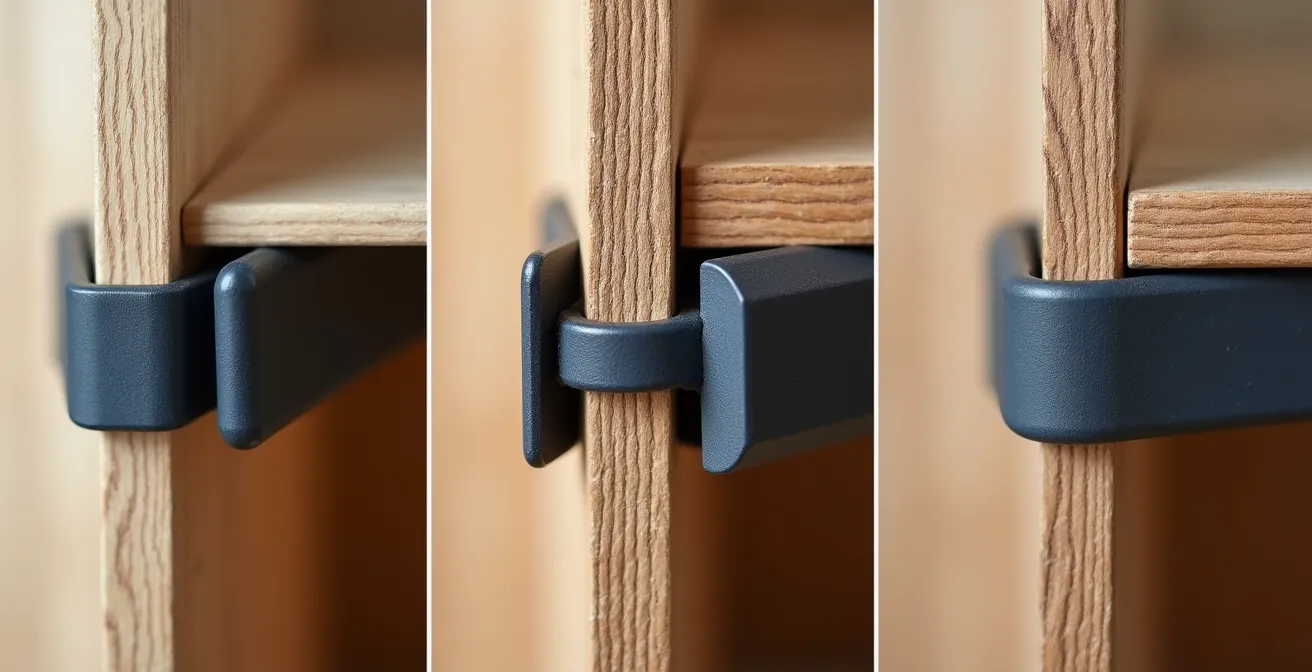
The promise of modularity hinges on one critical detail: the durability of its connections. A modular system that wobbles or requires complex tools for reconfiguration quickly becomes more frustrating than functional. For furniture that will endure the daily choreography of transformation—from a sofa to a daybed, from a lounger to dining seats—the strength of its joints is paramount. The material and design of these connectors determine whether your investment will withstand years of use or fail after a few months. Metal connectors, such as heavy-duty alligator clips or steel brackets, generally offer superior strength and longevity for daily use compared to plastic alternatives.
When evaluating a modular system, inspect the joint mechanism closely. Are the components robust? Do they lock securely with a satisfying click, or do they feel loose? High-quality systems often use a combination of materials to balance strength, weight, and ease of use. For instance, a wooden frame might be reinforced with metal plates at connection points to prevent wear and tear. This is where material choice becomes crucial for long-term stability.
The following table, based on recent market analysis, breaks down how different materials perform in terms of durability and joint strength, providing a clear guide for selecting a system built to last. As the data shows, a detailed comparison of furniture materials reveals a direct correlation between material type and its suitability for frequent reconfiguration.
| Material Type | Market Share 2024 | Durability Rating | Joint Strength |
|---|---|---|---|
| Wood | 35.7% | High | Excellent with proper brackets |
| Metal | 28.4% | Very High | Superior for daily use |
| Plastic/Composite | 21.3% | Medium | Good with reinforcement |
| Mixed Materials | 14.6% | Variable | Depends on connection type |
The macro photograph below showcases different types of high-performance connectors, from brushed metal clips to reinforced brackets. Visualizing these mechanisms helps in understanding that the unseen details are what guarantee a piece’s resilience through countless transformations.
Ultimately, investing in a system with superior joint technology is investing in the longevity of your home’s functionality. Don’t be swayed by aesthetics alone; the true value of modular furniture lies in its ability to adapt without compromise.
Velvet or Performance Weave: Which Survives Dining and Sleeping Daily?
In a space that doubles as a bedroom, dining room, and living room, the upholstery on your modular sofa is not a decorative choice—it’s a high-performance surface. The fabric must withstand nightly sleep, accidental spills from dinner, and the constant friction of reconfiguration. While plush velvet offers a luxurious aesthetic, it often falls short in the face of such demanding, dual-use scenarios. Its dense pile can trap odors and moisture, a significant issue in a compact studio, and it is notoriously difficult to clean after a red wine spill.
The key to selecting the right fabric lies in its technical specifications. For furniture that serves multiple functions, you must prioritize durability metrics. Look for fabrics with a high “rub count,” ideally a minimum of 25,000 on the Martindale scale, which indicates its resistance to abrasion. Furthermore, fabrics treated for stain resistance and with moisture-wicking properties are essential. This is where modern performance weaves excel. These textiles are engineered with synthetic fibers that repel liquids, resist pilling, and offer superior breathability, preventing the odor retention common with natural fibers like cotton or dense velvets.
This doesn’t mean you have to sacrifice style for function. A savvy approach is to mix materials. You can use a highly durable performance weave on the primary, high-contact surfaces like seat cushions and a more decorative fabric like velvet on backrests or throw pillows. This strategy provides the necessary resilience for daily life while retaining a touch of luxury. As consumers become more aware, there is also a growing trend toward sustainable options, with market research indicating that 15% more attention is being paid to natural, durable materials like bamboo and recycled performance fabrics.
The Measurement Mistake That Makes Modular Sofas Block Walkways
The single most common and costly error in furnishing a small studio is forgetting that furniture exists in four dimensions: width, depth, height, and time. Homeowners meticulously measure their space for a sofa in its primary “Lounge Mode” but completely neglect to account for its other functional states. They forget to measure for the “dynamic clearance”—the space required to move, pivot, and reconfigure the modules. The result is a modular system that is technically modular but practically immovable because it collides with a wall, a media console, or another piece of furniture during transformation.
To avoid this, you must think like a choreographer. Before purchasing, use painter’s tape on the floor to map out the footprint of the modular pieces in every intended configuration: as a sectional, as separate seats for hosting, and as a guest bed. Critically, you must maintain a minimum of 30-36 inches for all major walkways in every layout. A case study of various 400 sq ft studios published on designingidea.com highlights that successful layouts consistently planned for these multi-modal pathways, whereas failing layouts only considered the primary arrangement.
The biggest oversight is often the pivot radius. When separating a corner piece from a sectional, you don’t just pull it straight out; you often need to rotate it. This requires adding at least 18 inches of clearance to the furniture’s width. This simple calculation can be the difference between a fluid, adaptable space and a frustratingly static one.
Your Pre-Purchase Measurement Checklist
- Map Transformation Paths: Use painter’s tape to outline each module’s footprint in all intended layouts before buying.
- Maintain Walkways: Ensure a clear path of 30-36 inches exists in every single configuration, not just the primary one.
- Account for Pivot Radius: Add an extra 18 inches to the furniture’s width in your plan to accommodate the space needed for turning and moving pieces.
- Check Vertical Clearances: Verify that modules, especially taller ones, won’t block essential wall outlets, light switches, or under-window access when moved.
- Test All Layouts: Use the actual measurements from the manufacturer to test every intended layout on your floor plan, confirming clearances for ‘Lounge,’ ‘Dining,’ and ‘Hosting’ modes.
Which Module to Buy First: Building a Sectional Over 12 Months
Furnishing a studio on a young professional’s budget is a marathon, not a sprint. The beauty of a modular system is the ability to build it piece by piece, but this requires a strategic “module-first” approach. The question is, where do you start? The most logical and versatile starting point is not a corner piece or an armchair, but a large, standalone ottoman or a chaise lounge module. This single piece offers immediate, maximum functionality from day one.
An oversized ottoman can serve as a coffee table (with a tray), extra seating for a guest, a footrest, or even a temporary sleeping surface in a pinch. A chaise lounge provides a dedicated spot for relaxation that feels more substantial than an armchair but is less committal than a full sofa section. Starting with this core piece allows you to live in and understand your space before committing to the full sectional layout. Over the next few months, you can observe your own movement patterns and hosting needs, informing which module to purchase next. Perhaps you realize you need another seat more than a corner piece, or that two smaller ottomans would be more flexible than one large one.
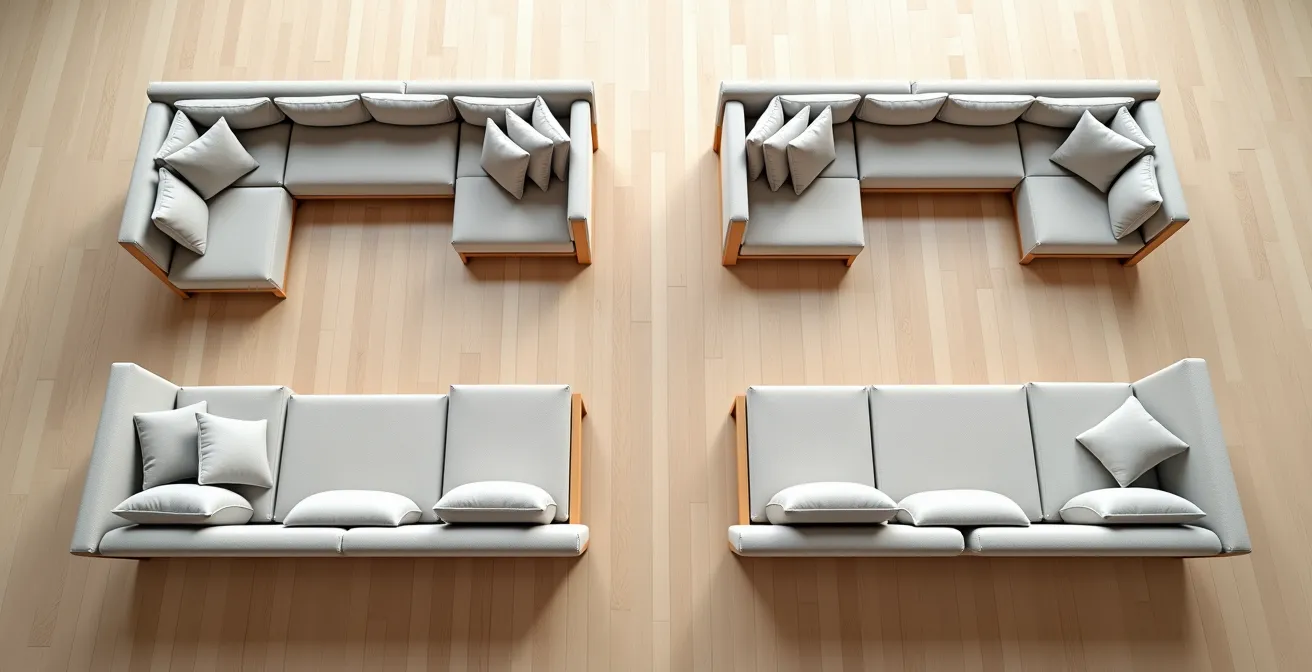
This phased approach, illustrated in the overhead view above, turns a significant financial outlay into a manageable series of smaller investments. It also ensures that the final sectional is perfectly tailored to your actual lifestyle, not just an idealized version of it. You build your sofa in response to your needs, creating a truly custom solution over time. The goal is to have each new module add a new layer of functionality, slowly evolving your studio from a space with a single chair to a fully equipped social hub.
How to Hide a Dishwasher in a Kitchenette Without Losing Storage?
In a studio apartment, every cabinet and every inch of countertop is prime real estate. Integrating a dishwasher into a compact kitchenette often feels like an impossible choice: sacrifice precious storage for convenience. However, with clever design and the right appliances, you can have both. The key is to move beyond the standard 24-inch built-in model and explore more spatially intelligent solutions. The growing trend of urbanization has led to a surge in demand for such appliances, with market research showing that urbanization drives 6.2% annual growth in the space-efficient appliance sector.
One of the most effective strategies is to opt for an 18-inch drawer dishwasher. These units are designed to fit into a standard base cabinet, preserving the full, uninterrupted countertop above them for food prep. Another innovative solution is to create a mobile dishwasher island. By placing a compact, freestanding 18-inch dishwasher on heavy-duty casters and topping it with a butcher block, you create a movable prep surface that can be rolled out of the way when not in use. This maintains the flexibility of your floor plan while adding both a cleaning appliance and extra counter space.
For those who prefer a completely seamless look, hiding a countertop dishwasher is also an option. Instead of letting it sit permanently on the counter, build it into a dedicated appliance garage with a custom roll-up or pocket door. This keeps the appliance accessible but out of sight, freeing up your visual and physical workspace. By thinking vertically and creatively, you can successfully integrate modern conveniences without compromising the critical storage your small kitchen demands.
Why Your Heavy Curtains Aren’t Blocking the Street Noise?
One of the harshest realities of urban studio living is the constant intrusion of street noise—sirens, traffic, and late-night chatter. Many people invest in heavy, “soundproof” curtains, only to find they barely muffle the low-frequency rumble of a passing bus. The reason is that mass alone (a heavy fabric) is only effective at blocking high-frequency sounds. True soundproofing requires a more sophisticated approach based on two principles: eliminating air gaps and creating decoupling.
Sound, like water, will find any crack to leak through. Your heavy curtains are likely ineffective because there are gaps at the top, bottom, and sides of the window. For curtains to work, they need to be oversized—ideally 2.5 to 3 times the width of the window—to create dense, sound-trapping folds. They must also extend well beyond the frame on all sides and ideally touch the floor. Using a wraparound curtain rod helps to seal the side gaps, which are a major source of sound leakage.
The second, more advanced technique is decoupling. This involves creating an air gap between two separate layers of material, which is highly effective at absorbing low-frequency sound waves. You can achieve this with a double-rod curtain system. Hang a layer of heavy, sound-absorbing curtains on the rod closest to the room and a separate, simpler liner or another curtain on the rod closest to the window. This trapped layer of air acts as a powerful insulator against vibrations. As acoustic experts emphasize, the material is only part of the solution.
The key to blocking street noise isn’t just heavy fabric – it’s eliminating sound leaks at the top, bottom, and sides of windows while creating air gaps for low-frequency absorption.
– Acoustic Design Principles, Creative Studio Apartment Floor Plan Ideas
By combining a fully sealed, oversized curtain with a decoupled double-rod system, you can transform your window from a source of noise pollution into an effective acoustic barrier.
Key Takeaways
- Master Dynamic Clearance: Always measure for the movement of furniture, not just its static position, ensuring 30-36 inch walkways in all configurations.
- Prioritize Performance Fabrics: For dual-use furniture, choose upholstery with a high rub count (25,000+ Martindale) and stain resistance over purely aesthetic options.
- Adopt a Phased Strategy: Start with a single, highly versatile module like an ottoman and build your sectional over time to fit your budget and real-world needs.
How to Design a Full Kitchen in Under 6 Feet of Linear Space?
Designing a fully functional kitchen in a space less than six feet long seems like an impossible task, but it’s a standard challenge in modern micro-living. The solution lies in ruthless optimization and embracing compact technology. The layout must be structured with the precision of a chef’s station, following a logical workflow. A proven model for a 6-foot kitchen places the sink at one end, a cooktop in the middle, and a dedicated prep space at the other. This arrangement minimizes movement and creates an efficient triangle of activity, even on a straight line.
To make this work, you must select compact, 18-inch appliances. An 18-inch dishwasher, a two-burner cooktop, and a slim refrigerator are non-negotiable. Free up precious counter space by using a wall-mounted microwave/convection oven combo instead of a countertop model. Storage must go vertical. The “1.5x vertical storage rule” is a useful guideline: aim for floor-to-ceiling pantry cabinets to get at least one and a half times the storage of a standard kitchen. This forces you to utilize the often-wasted space above eye level.
The final 18 inches of your linear kitchen should be designed as a transitional flex space. This could be a small, rolling butcher block cart that can be moved to serve as an island, a bar, or extra counter space where needed. This strategy ensures that your tiny kitchen can support real cooking, not just reheating takeout. By combining a logical workflow with compact appliances and aggressive vertical storage, a 6-foot linear run can provide all the functionality of a kitchen twice its size.
By applying these strategic principles of transformation, material selection, and spatial choreography, your 400-square-foot studio can evolve into a dynamic, highly functional home. To begin this process, the next logical step is to audit your own space and start mapping out the potential for a truly modular and adaptive living environment.